

Data Federation with Presto on Docker
Introduction
This post is about describing how to set a Presto installation in the form of a cluster on top of Docker containers. On the process of setting up the cluster several useful features of Docker will be presented. However, the main purpose is to show how Presto can connect to different databases and use them a source to perform queries over those data providing the user with the so-called data federation. That is to say, enabling to query different data sources from a single point of operation, which is Presto.
To query the data behind, Presto provides the user with a dialect of SQL that expands SQL functionality with very interesting features such as interactive queries or performing joins in between tables from different database technologies. Let it suffice to say, that this will be possible under the conditions of data models consistency between the different data base technologies.
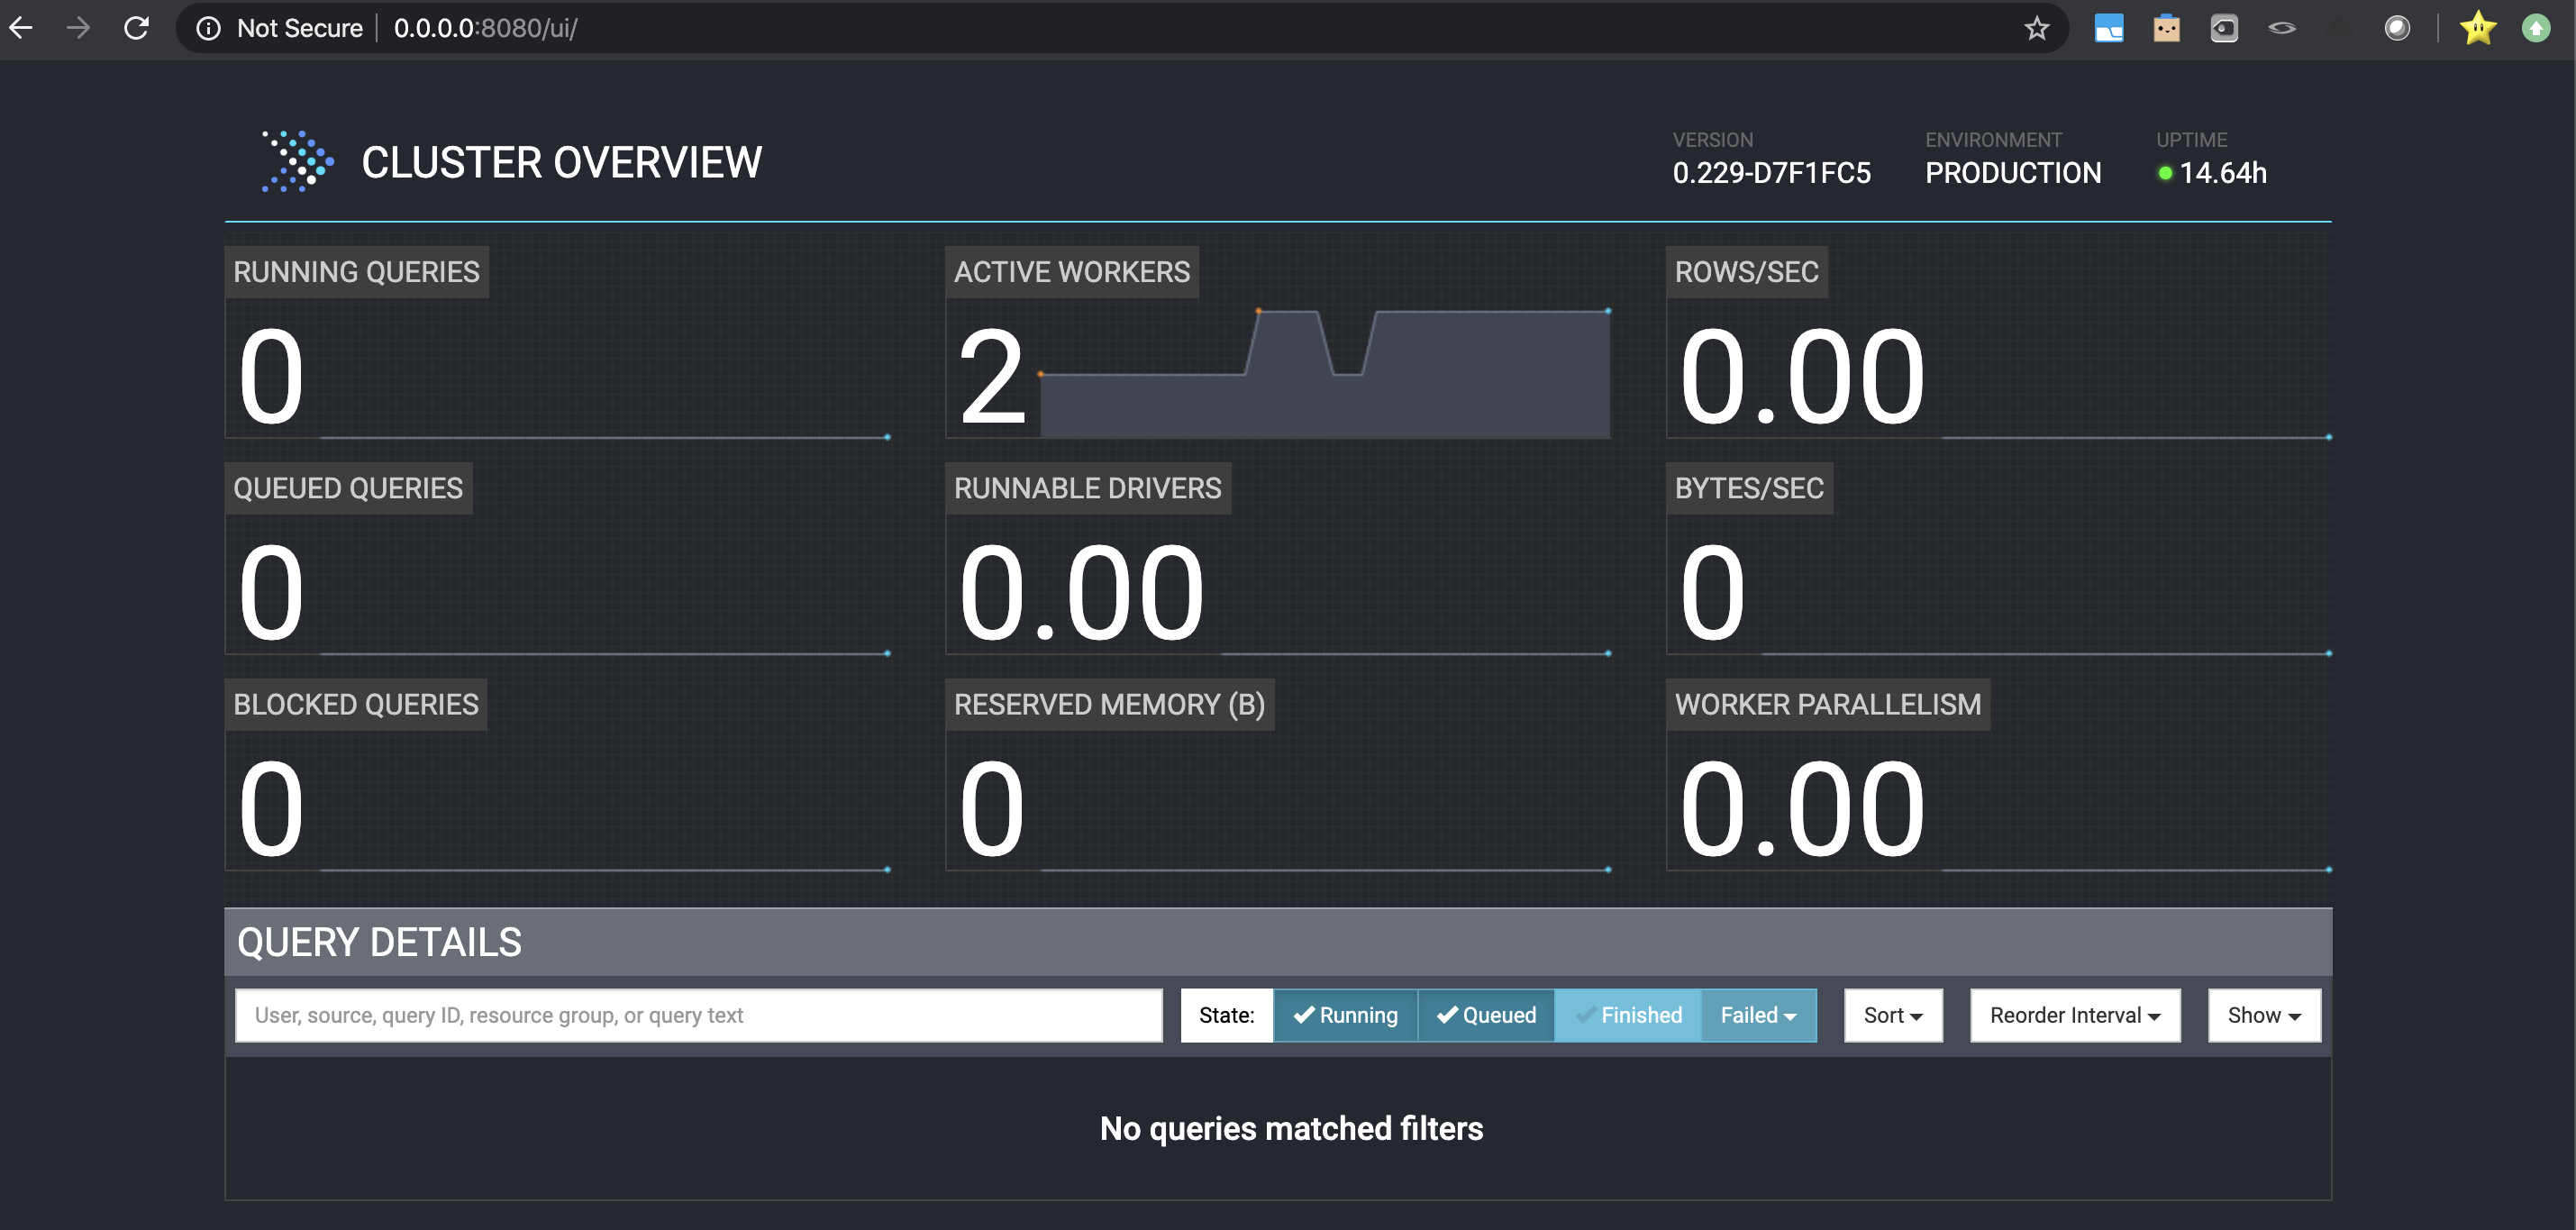
The picture below shows the Presto control panel. For this demonstration two nodes have been created by using different containers. One that runs as coordinator as well as worker and another node as an extra worker node. In this tutorial, how to create the system will be explained as well as how to connect it with different database technologies. For this, extra containers will be created, one for each database technology to use.
Setting up Docker
Coordinator container
The Dockerfile of below shows how to configure the coordinator container. An openjdk image is used as a container base to configure Presto on top of it. This file shouldn’t be taken for production as it contains some configurations to make it easier to play with the system. For example: a root password defined so it is easy to install software having the container in running state, or defining some IPs with hardcoding to avoid introducing other concepts in the tutorial.
Pay attention to the lines that contain the configuration of Presto. Even though, the lines a pretty self-explanatory I recommend looking at Presto’s website in its section showing a basic configuration. Basically, here the idea is to indicate that this instance works as coordinator as well as as a worker, define a node id unique in the cluster and then defining the connectors to other databases that will be located in other containers.
FROM openjdk:8-jre-slim

ARG MIRROR="https://repo1.maven.org/maven2/com/facebook/presto"
ARG PRESTO_VERSION="0.229"
ARG PRESTO_BIN="${MIRROR}/presto-server/${PRESTO_VERSION}/presto-server-${PRESTO_VERSION}.tar.gz"
ARG PRESTO_CLI_BIN="${MIRROR}/presto-cli/${PRESTO_VERSION}/presto-cli-${PRESTO_VERSION}-executable.jar"

USER root
RUN echo "root:1234" | chpasswd

RUN apt-get update && apt-get install -y vim

RUN apt-get update && \
    apt-get install -y --allow-unauthenticated curl wget less && \
    apt-get clean && rm -rf /var/lib/apt/lists/*

ENV PRESTO_HOME /presto
ENV PRESTO_USER presto
ENV PRESTO_CONF_DIR ${PRESTO_HOME}/etc
ENV PATH $PATH:$PRESTO_HOME/bin

RUN useradd \
        --create-home \
        --home-dir ${PRESTO_HOME} \
        --shell /bin/bash \
        $PRESTO_USER

RUN mkdir -p $PRESTO_HOME && \
    wget --quiet $PRESTO_BIN && \
    tar xzf presto-server-${PRESTO_VERSION}.tar.gz && \
    rm -rf presto-server-${PRESTO_VERSION}.tar.gz && \
    mv presto-server-${PRESTO_VERSION}/* $PRESTO_HOME && \
    rm -rf presto-server-${PRESTO_VERSION} && \
    mkdir -p ${PRESTO_CONF_DIR}/catalog/ && \
    mkdir -p ${PRESTO_HOME}/data && \
    cd ${PRESTO_HOME}/bin && \
    wget --quiet ${PRESTO_CLI_BIN} && \
    mv presto-cli-${PRESTO_VERSION}-executable.jar presto && \
    chmod +x presto && \
    chown -R ${PRESTO_USER}:${PRESTO_USER} $PRESTO_HOME

# Need to work with python2
# See: https://github.com/prestodb/presto/issues/4678

RUN apt-get update && apt-get install -y --no-install-recommends \
		python \
	&& rm -rf /var/lib/apt/lists/* \
    && cd /usr/local/bin \
	&& rm -rf idle pydoc python python-config

RUN mkdir -p /var/presto
RUN mkdir -p /var/presto/data
RUN chmod -R 777 /var/presto

USER $PRESTO_USER

# create presto files
RUN touch /presto/etc/node.properties
RUN touch /presto/etc/jvm.config
RUN touch /presto/etc/config.properties
RUN touch /presto/etc/log.level
RUN touch /presto/etc/catalog/jmx.properties
RUN touch /presto/etc/catalog/mysql.properties
RUN touch /presto/etc/catalog/mongodb.properties

RUN echo "node.environment=production \nnode.id=ffffffff-ffff-ffff-ffff-ffffffffffff\nnode.data-dir=/var/presto/data" >> /presto/etc/node.properties

RUN echo "-server\n\n-Xmx16G\n-XX:+UseG1GC\n-XX:G1HeapRegionSize=32M\n-XX:+UseGCOverheadLimit\n-XX:+ExplicitGCInvokesConcurrent\n-XX:+HeapDumpOnOutOfMemoryError\n-XX:+ExitOnOutOfMemoryError" >> /presto/etc/jvm.config

RUN echo "coordinator=true\nnode-scheduler.include-coordinator=true\nhttp-server.http.port=8080\nquery.max-memory=5GB\nquery.max-memory-per-node=1GB\ndiscovery-server.enabled=true\ndiscovery.uri=http://172.17.0.2:8080" >> /presto/etc/config.properties

RUN echo "com.facebook.presto=INFO" >> /presto/etc/log.level

RUN echo "connector.name=jmx" >> /presto/etc/catalog/jmx.properties

RUN echo "connector.name=mysql\nconnection-url=jdbc:mysql://172.17.0.3:3306\nconnection-user=root\nconnection-password=secret" >> /presto/etc/catalog/mysql.properties

RUN echo "connector.name=mongodb\nmongodb.seeds=172.17.0.4" >> /presto/etc/catalog/mongodb.properties

# run presto
CMD ["/presto/bin/launcher", "run"]
Worker container
The Dockerfile below shows the worker container configuration. The configuration is very similar to the coordinator’s one. However, here the node is set as worker, the coordinator address has to be specified and the connectors with other databases are not listed. Bear in mind, that a unique node id is also required for the worker. Indeed, if more nodes were added to the cluster, each one would have to be configured with a unique id.
FROM openjdk:8-jre-slim

ARG MIRROR="https://repo1.maven.org/maven2/com/facebook/presto"
ARG PRESTO_VERSION="0.229"
ARG PRESTO_BIN="${MIRROR}/presto-server/${PRESTO_VERSION}/presto-server-${PRESTO_VERSION}.tar.gz"
ARG PRESTO_CLI_BIN="${MIRROR}/presto-cli/${PRESTO_VERSION}/presto-cli-${PRESTO_VERSION}-executable.jar"

USER root
RUN echo "root:1234" | chpasswd

RUN apt-get update && apt-get install -y vim

RUN apt-get update && \
    apt-get install -y --allow-unauthenticated curl wget less && \
    apt-get clean && rm -rf /var/lib/apt/lists/*

ENV PRESTO_HOME /presto
ENV PRESTO_USER presto
ENV PRESTO_CONF_DIR ${PRESTO_HOME}/etc
ENV PATH $PATH:$PRESTO_HOME/bin

RUN useradd \
        --create-home \
        --home-dir ${PRESTO_HOME} \
        --shell /bin/bash \
        $PRESTO_USER

RUN mkdir -p $PRESTO_HOME && \
    wget --quiet $PRESTO_BIN && \
    tar xzf presto-server-${PRESTO_VERSION}.tar.gz && \
    rm -rf presto-server-${PRESTO_VERSION}.tar.gz && \
    mv presto-server-${PRESTO_VERSION}/* $PRESTO_HOME && \
    rm -rf presto-server-${PRESTO_VERSION} && \
    mkdir -p ${PRESTO_CONF_DIR}/catalog/ && \
    mkdir -p ${PRESTO_HOME}/data && \
    cd ${PRESTO_HOME}/bin && \
    wget --quiet ${PRESTO_CLI_BIN} && \
    mv presto-cli-${PRESTO_VERSION}-executable.jar presto && \
    chmod +x presto && \
    chown -R ${PRESTO_USER}:${PRESTO_USER} $PRESTO_HOME


# Need to work with python2
# See: https://github.com/prestodb/presto/issues/4678


RUN apt-get update && apt-get install -y --no-install-recommends \
		python \
	&& rm -rf /var/lib/apt/lists/* \
    && cd /usr/local/bin \
	&& rm -rf idle pydoc python python-config


RUN mkdir -p /var/presto
RUN mkdir -p /var/presto/data
RUN chmod -R 777 /var/presto


USER $PRESTO_USER


# create presto files
RUN touch /presto/etc/node.properties
RUN touch /presto/etc/jvm.config
RUN touch /presto/etc/config.properties
RUN touch /presto/etc/log.level
RUN touch /presto/etc/catalog/jmx.properties

RUN echo "node.environment=production \nnode.id=ffffffff-ffff-ffff-ffff-fffffffffff1\nnode.data-dir=/var/presto/data" >> /presto/etc/node.properties

RUN echo "-server\n\n-Xmx16G\n-XX:+UseG1GC\n-XX:G1HeapRegionSize=32M\n-XX:+UseGCOverheadLimit\n-XX:+ExplicitGCInvokesConcurrent\n-XX:+HeapDumpOnOutOfMemoryError\n-XX:+ExitOnOutOfMemoryError" >> /presto/etc/jvm.config

RUN echo "coordinator=false\nhttp-server.http.port=8080\nquery.max-memory=50GB\nquery.max-memory-per-node=1GB\ndiscovery.uri=http://172.17.0.2:8080" >> /presto/etc/config.properties

RUN echo "com.facebook.presto=INFO" >> /presto/etc/log.level

RUN echo "connector.name=jmx" >> /presto/etc/catalog/jmx.properties

#CMD ["launcher", "run"]

# run presto
CMD ["/presto/bin/launcher", "run"]
Now let’s build the image that will serve to build the containers:
docker build -t greattenchu/openjdk-presto:1.0 .
docker build -t greattenchu/openjdk-prestoworker:1.0 . -f prestoWorker.Dockerfile
And here are the commands to run each container and connect with each one interactively
docker run -p 8080:8080 --rm -ti greattenchu/openjdk-presto:1.0 /bin/sh
docker run -p 8081:8081 --rm -ti greattenchu/openjdk-prestoworker:1.0 /bin/sh
Next is to set up the containers of the databases. Here, MySQL and MongoDB have been taken due to its wide use.
MySQL container
For the MySQL container first a docker volume is created. This will allow to keep the databases in case the container is stoped. Once the container is created, it is mounted to the container when executing the run command. Last, we connect to the container while invoquing the mysql prompt.
docker volume create mysql-db-data
docker volume ls
docker run -d -p 33060:3306 --name mysql-db -e MYSQL_ROOT_PASSWORD=secret --mount src=mysql-db-data,dst=/var/lib/mysql mysql
docker exec -it mysql-db mysql -p
To fill the database with some sample data, a file containing a Spotify song list is used. Spotify list. You can for example insert a part of the list and another part to MongoDB to play later with the federated queries. To load data to MySQL a database client can be used. In this case, I have used TablePlus, which is a very updated client that allows to connect to several database technologies. It supports the last version of MySQL (to the date of this post, it is the 8.019).
In case you don’t want to spend time defining the table, below there’s the code to define the table and load the data:
create database spotifyDB;
use spotifyDB;

create table spotifysongs (
  id int not null primary key,
  acousticness double,
  danceability double,
  duration_ms int,
  energy double,
  instrumentalness double,
  key_ int,
  liveness double,
  loudness double,
  mode_ int,
  speechiness double,
  tempo double,
  time_signature double,
  valence double,
  target int,
  song_title varchar(50),
  artist varchar(50)
);

load data infile '/Users/david/Downloads/spotifyclissification.csv' into table spotifysongs fields terminated by ',';
MongoDB container
Setting up the MongoDB container is even easier. In this case, we don’t mind about keeping the data and we just run a default invocation.
docker run --name some-mongo -d -p 27017:27017 mongo:4.2.2-bionic
docker exec -it some-mongo mongo
To load the data into MongoDB a different approach has been taken. We connect to the container of MongoDB, launch the MongoDB prompt and create the collection. Although the same can be done through the database client. After this, the data is copied to the container with the cp command. Then, inside the container, we execute the mongoimport command importing with this the data in the file. You can prepare yourself the data to be loaded into MongoDB as a subset of the provided data above.
db.createCollection("spotifysongs")
docker cp ./spotifyclissificationmongodb.csv 0615c3575a49:/root
mongoimport -d spotifydata -c spotifysongs --type csv --file ./spotifyclissificationmongodb.csv --headerline
Querying with Presto
Finally, all the system is set up and ready to be used. Connect to Presto coordinator container and execute presto. Then go through the catalogs and schemas to check that the links between Presto coordinator and the databases work. Roughly speaking, catalogs are each connectors with each DB technology, and schemas are databases inside each technology.
show catalogs;
show schemas from mysql;
show tables from mysql.spotifydb;
use mysql.spotifydb;
Once the connections are checked a federated queries can be run. Below there is and example:
SELECT (
    SELECT COUNT(*) FROM mysql.spotifydata.spotifysongs
), (
    SELECT COUNT(*) FROM mongodb.spotifydata.spotifysongs
);
This will return the number of rows for each database technology. If you try to run the a query to such as selecting all rows from all database technologies and return the results, for example by separating each database by a comma, you’ll find out that the result is not a list concatenating both tables but some other inconsistent results. In this sense, federated queries are limited. They are effective to count the rows of each DB technology or to make joins between DB technologies with compatible table columns, which is something that can be very useful if for example the data model is scattered between databases. This can happen very easily in environments with some legal regulations to avoid having some sensitive data together. For example in a clinical context, where donors or patients data are scattered across different databases and even infrastructures.