

Configure Jenkins to work with Gitlab, Docker and Skaffold
In today’s post we are going to see how to install Jenkins in a straightforward way in a bare metal server and explain what’s the function of Jenkins in a GitOps setup. First we’ll be going though a typical GitOps setup and how it works in each step. Then we’ll take into account the rest of the CI/CD pipeline is already setup and we’ll focus on the Jenkins part. So, let’s get started!
Crash course in GitOps
GitOps is a relatively recent concept at the moment of writing this post. So, it’s very likely that you are wondering if GitOps is a concept only related to Git. Indeed, the term GitOps refers to the fact of a software development approach where the entire application infrastructure and configuration are managed and synchronized through Git repositories. It leverages version control and pull-based deployment to achieve declarative, auditable, and automated application deployment and management. It promotes a Git-centric workflow for consistent and scalable software delivery.
The below picture shows a typical GitOps flow in which not only the CI/CD is applied to the code but also to the infrastructure in behind. This is easy to do thanks to the fact that the kubernetes deployments are written in .yaml format. So, in this sense, the kubernetes manifests are the IaC in this use case. Let’s remember the concept of immutability in the infrastructure, because it’s precisely because of kubernetes enabling this concept what leaves the whole pipeline relatively simple. In the case, we weren’t using kubernetes but we were using virtual machines, then the most common approach if we wanted to automate the infrastructure deployment would provably involve using Terraform and that would complicate things in the pipeline.
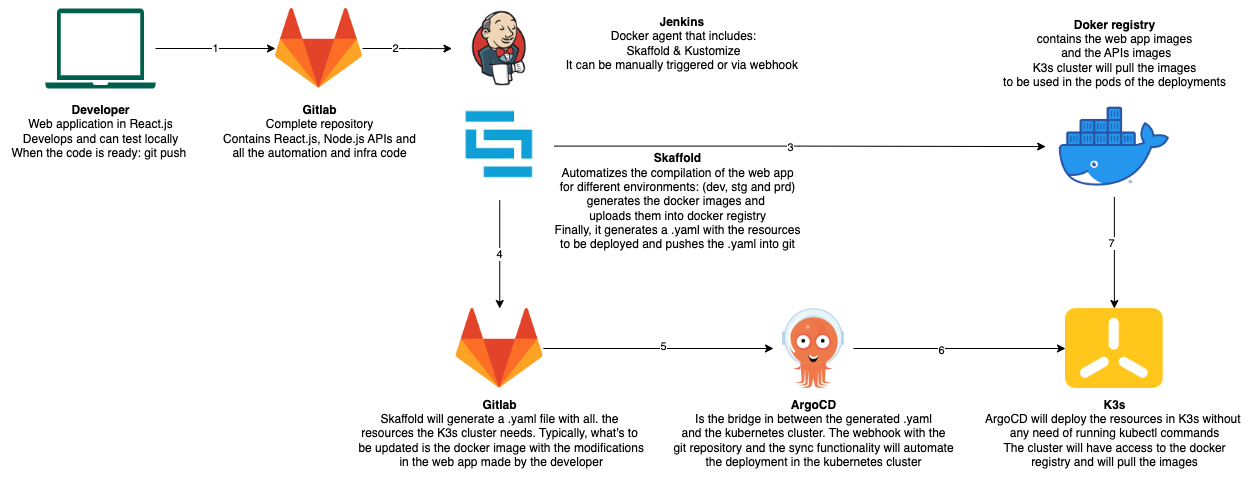 Basically, we are relying on the repo in Gitlab and Jenkins (using it as a CI tool) and ArgoCD are targeting the repo and the docker registry to manipulate all what is needed until the yaml files and the docker images are ready with the last updates. ArgoCD can select what’s to be synchronized in the K3s cluster and how. In this example, we have selected K3s distribution because of it’s easy installation and it’s support being a CNCF project.
Jenkins Installation
We are going to install Jenkins directly in an Linux server running Ubuntu 22.04.1 LTS Server without UI. If you have checked a previous post about installing ArgoCD, in that case we installed it in form of a pod in a K3s server. In the case of Jenkins, the decision is to make the installation directly into the server because for this precise scenario where the cluster is a single machine we want to make Jenkins independent of the stability of the K3s cluster inside of this single machine. However, take this as a decision for this post. Yet, as we’ll be seeing, our Jenkins installation will be using docker containers to run different tasks. So, having the installation in a the bare metal machine will save us of using dind for the workers (docker in docker).
In the case of Jenkins, the processes will very likely to consume a good amount of CPU and RAM because we will be executing from there the steps that build React and Node.s projects. As we know, this workloads are tricky and resource consuming, this is why cloud vendors have created their paid services that are specialised in building docker images with high performance.
#install java first
#installing-specific-versions-of-openjdk
sudo apt install default-jre
#optional
sudo apt install default-jdk

# if the above didn't work well, do the below also
wget -q -O - https://pkg.jenkins.io/debian-stable/jenkins.io.key | sudo apt-key add -
sudo sh -c 'echo deb http://pkg.jenkins.io/debian-stable binary/ > /etc/apt/sources.list.d/jenkins.list'

sudo touch /etc/apt/trusted.gpg.d/jenkins.gpg
sudo wget -q -O /etc/apt/trusted.gpg.d/jenkins.gpg https://pkg.jenkins.io/debian-stable/jenkins.io.key
sudo apt-key adv --keyserver keyserver.ubuntu.com --recv-keys 5BA31D57EF5975CA

sudo apt update
sudo apt install jenkins
Now we should be able to login to Jenkins webUI and configure the connection to the Gitlab account. Just use the IP of your server followed by the port 80890, which is the default port of Jenkins.
Configuration of Jenkins and Gitlab
To configure Jenkins the first point is to establish the connection with the Gitlab account. There are several ways to do this. Here we are going to use a couple of basic ways to do it. First of all it’s important to know that we are going to do is basically checkout the complete repository from Gitlab to a Jenkins agent (docker container), from there we’ll execute the build commands which will upload the new Docker generated images to Docker hub and finally we’ll push the changes of the Kubernetes resources back to the gitlab repository so ArgoCD will finally makes its work synchronising from what’s new in the resources, which is basically the pod definitions pointing to the new ids of those newly generated Docker images.
In the steps that we interact with Gitlab we are going to use two ways to authenticate with Gitlab. This is because some Git commands require some interactions from the keyboard and that is done with an ssh-agent in Jenkins. This aspect can be bettered, but for our demonstration purpose is valid approach because it shows two ways to authenticate.
Basically, we create one username with password credential and one SSH username with private key credential. For the first one is using the username of the Gitlab account with its password.
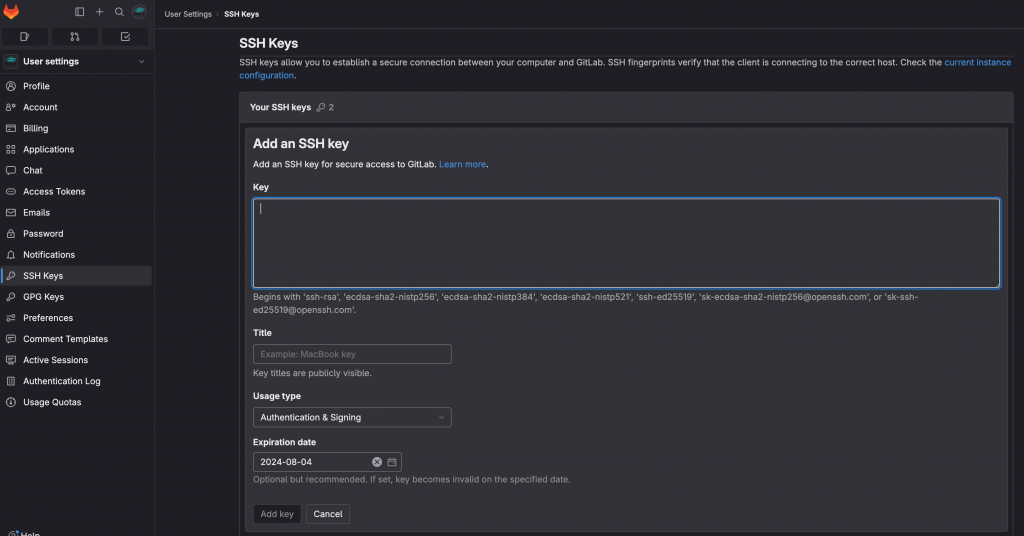
 For the second one, we need to create an SSH key in our Linux server. Typically done with: ssh-keygen -t rsa –b 4096. We’ll then copy they public key into the Gitlab account. In Gitlab go to “User Settings” -> “SSH Keys” and create a new key. Copy the public key content in the Key text box.
And finally we want get the convey this SSH key information to Jenkins as it is showing the credential n5010, because it will use it to establish the communication automatically with Gitlab. If we hadn’t Jenkins and we wanted to interact from our Llinux server with Gitlab we would only have to copy the public key into Gitlab.
We haven’t finished with our connections. Now it’s time for the Docker connection. Remember we are going to push images from the Jenkins agent to our Docker hub account. For development purposes we can use the free version but remember the images there are public with the exception of 1 free private repository at the time of writing this tutorial.
This credential in Jenkins is just a secret text.
variable name: DOCKER_PASS
variable secret text: passwordOfDockerHub
Now we also need to include the Jenkins user into the Docker group so the Jenkins user can access to the docker daemon. And restart Jenkins-
sudo usermod -aG docker jenkins
sudo systemctl restart jenkins
Add the Jenkins user to the group of docker so it can access the docker daemon
sudo usermod -aG docker jenkins
sudo systemctl restart jenkins
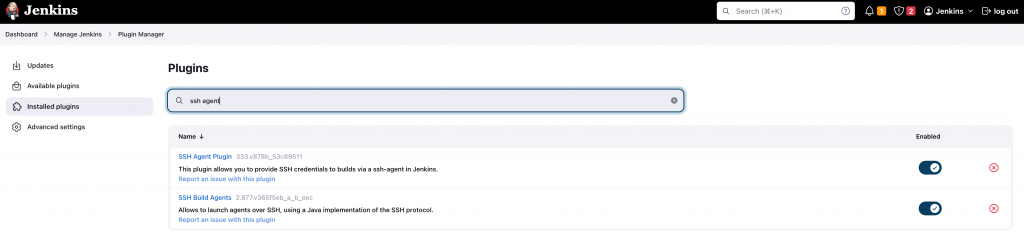
Now we are going to perform the the installation of the required Jenkins plugins:
“Manage Jenkins” -> “Manage Plugins” -> “Available Plugins”
This is how it should look like after installing the Docker plugins we’ll use for Jenkins.
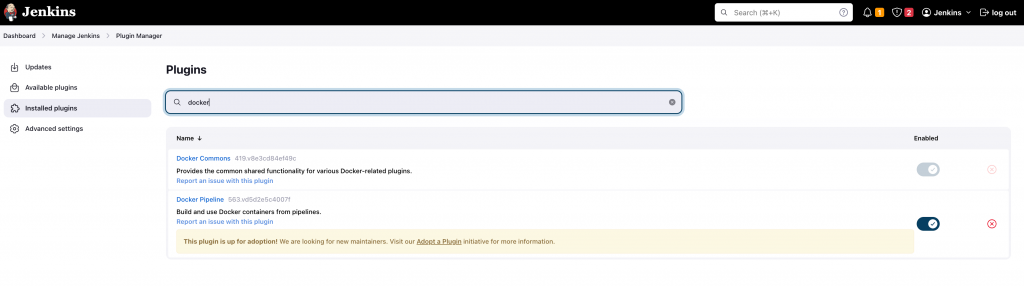
Install SSH Agent plugin. And this is how it looks like in the installed plugins after installing them.
Until here we have our Jenkins ready for the battle!
Creation of the CI part of the pipeline in Jenkins
To create a pipeline, from the Jenkins dashboard we are gong to create it with: “New Item” -> “Pipeline”. Assign it a name. Then, we make go into the pipeline and make click into “Configuration”. We scroll down to bottom and we edit the code of the pipeline in the text box. This is the most basic way to do it and it’s very fast for testing purposes. However, in a further step we’ll be editing this in our Gitlab repository and just connect the Gitlab repository with the Jenkins in our server to load that code. This leaves the code in a repository and makes the code edition more confortable at the expenses of having to commit the changes to detect them from Jenkins.
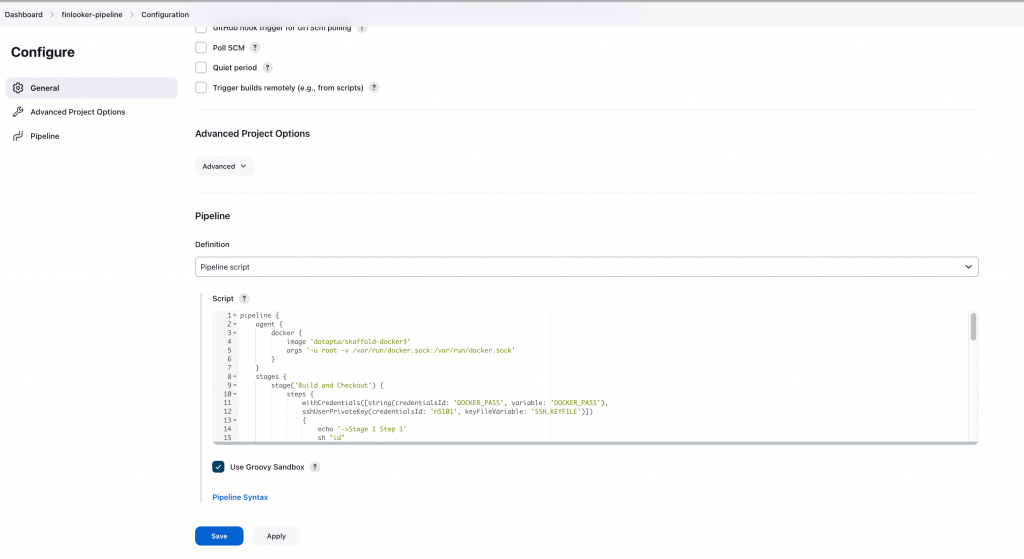
Once we are in the text box, just use the following code:
pipeline {
    agent {
        docker {
            image 'datapta/skaffold-docker3'
            args '-u root -v /var/run/docker.sock:/var/run/docker.sock'
        }
    }
    stages {
        stage('Build and Checkout') {
            steps {
                withCredentials([string(credentialsId: 'DOCKER_PASS', variable: 'DOCKER_PASS'),
                sshUserPrivateKey(credentialsId: 'n5101', keyFileVariable: 'SSH_KEYFILE')])
                {
                    echo '->Stage 1 Step 1'
                    sh "id"
                    sh "ls -lashtr ~"

                    sh "docker login -u datapta -p $DOCKER_PASS"

                    sh 'git config --global credential.helper cache'
                    sh 'git config --global push.default simple'

                    //checkout the main branch
                    checkout([
    				      $class: 'GitSCM',
    				      branches: [[name: 'main']],
    				      gitTool: 'git',
    				      userRemoteConfigs: [[url: "https://gitlab.com/datapta/finlooker-webapp.git", credentialsId: "gitlabdatapta"]]
    				    ])

                    sh 'git config --global user.name "dataptaofficial@gmail.com"'
                    sh 'git config --global user.email "dataptaofficial@gmail.com"'
                    sh 'git config --global http.sslverify "false"'
    				sh 'git config --global --add safe.directory /var/lib/jenkins/workspace/finlooker-pipeline'

    				sh 'cd /var/lib/jenkins/workspace/finlooker-pipeline/'
    				sh 'git remote set-url origin git@gitlab.com:datapta/finlooker-webapp.git'
                    sh 'git checkout main'

    				sshagent(['n5101']) {
    				    sh '''
                        set +x
                        mkdir ~/.ssh
                        ssh-keyscan gitlab.com >> ~/.ssh/known_hosts
                        git pull git@gitlab.com:datapta/finlooker-webapp.git
                        '''
                    }

    				sh 'skaffold build -p dev && skaffold render -p dev --output=finlooker-infra/k8s-render/dev/all-resources-dev.yaml'

                    //checkout the prd branch
                    checkout([
    				      $class: 'GitSCM',
    				      branches: [[name: 'prd']],
    				      gitTool: 'git',
    				      userRemoteConfigs: [[url: "https://gitlab.com/datapta/finlooker-webapp.git", credentialsId: "gitlabdatapta"]]
    				    ])

    				sh 'git config --global user.name "dataptaofficial@gmail.com"'
                    sh 'git config --global user.email "dataptaofficial@gmail.com"'
                    sh 'git config --global http.sslverify "false"'
    				sh 'git config --global --add safe.directory /var/lib/jenkins/workspace/finlooker-pipeline'

    				sh 'cd /var/lib/jenkins/workspace/finlooker-pipeline/'
    				sh 'git remote set-url origin git@gitlab.com:datapta/finlooker-webapp.git'
                    sh 'git checkout prd'

                    sshagent(['n5101']) {
    				    sh '''
    				    ssh-keyscan gitlab.com >> ~/.ssh/known_hosts
                        git pull git@gitlab.com:datapta/finlooker-webapp.git
                        '''
                    }

                    sh 'git merge main'
    				sh 'git add .'

    				sshagent(['n5101']) {
    				    sh '''
    				    ssh-keyscan gitlab.com >> ~/.ssh/known_hosts
                        git push
                        '''
                    }
                }
            }
        }
    }
}
Now were going to explain some of the key concepts of the code. To begin with, we declare a Jenkins agent. Because it’s the only agent declared and there’s no other directive with respect to agents, this tells the Jenkins that we’ll execute the whole pipeline in this agent. The agent is a docker container that we have prepared beforehand. This container already has installed Skaffold that will be used to automate the building of the Docker images and the generation of the Kubernetes resources. In this tutorial we are not going to go through the details of generating the image but feel free to use it as it is a the public repository of Docker Hub. Here it is important to notice that the container is mounting the docker daemon from the host Linux server. This is a little trick that we make to use the full potential of the server instead of relaying on the resources of the pod. Take into account also that because of we are delegating the Docker commands work to the server the Skaffold command, which is what under the hood calls to the Docker daemon, won’t need to execute anything with dind (docker in docker). This simplified quite a lot the process removing further tuning for Skaffold.
The next commands just configure Docker and Git to be operative inside of the agent by using the credentials we defined in the previous section.
Finally, the most related commands are the git actions philosophy are calling to Skaffold to build the images and to render the Kubernetes resources in yaml files. After this, the changes are pushed back to the same repository (remember we only changed yaml files and nothing about the code of the application here) but in a different branch. We are going to explain why it is done in a different branch in webhook section. The next step of the whole process ArgoCD will detect this change in the repository and will synchronise the pods in the K3s cluster.
Theoretically we would have to have a testing environment and then a production environment. We would make the changes in production only after the testing environment was running perfect. When talking about CI/CD, we can totally automate this last step in production as it has been described, which is what is called continuous deployment or we can tell ArgoCD to wait to make the synchronisation until the user accepts the change, which is what is called continuous delivery.
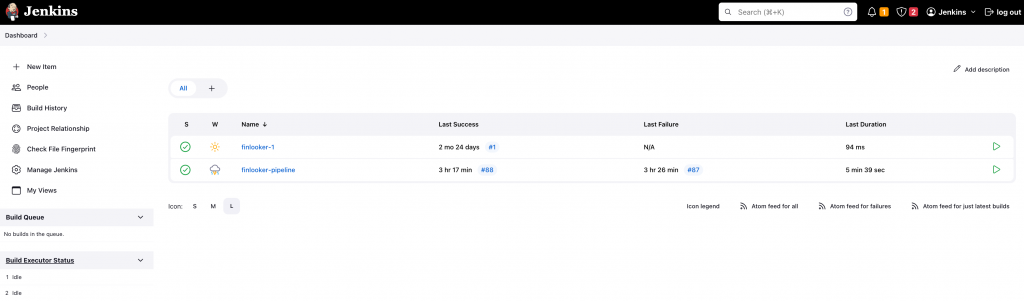
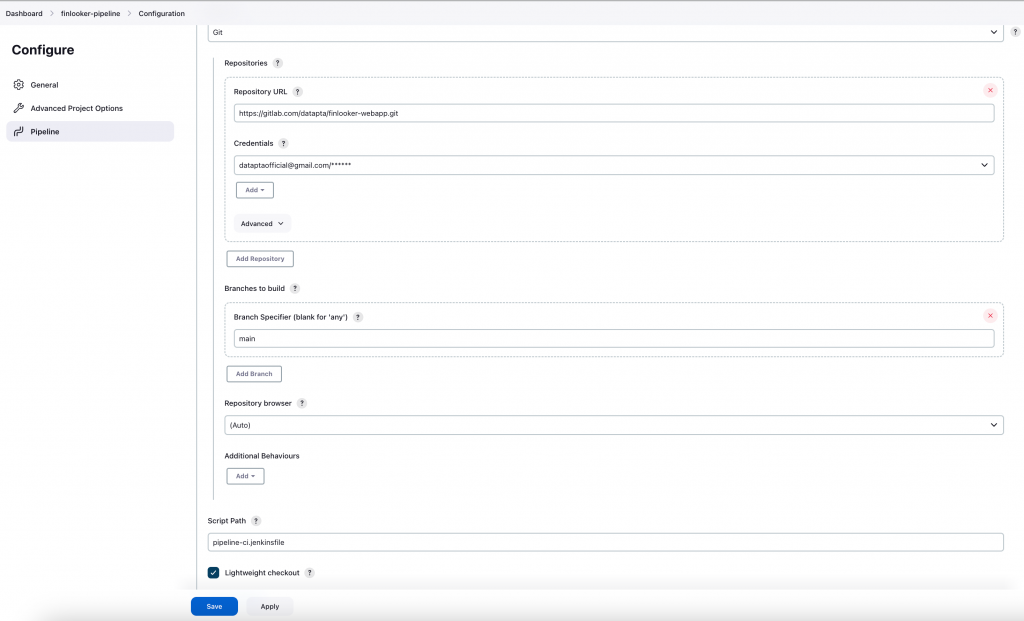
Now we can run the pipeline by making click in the “Build Now” button. If the pipeline works, we are ready to move the code of the pipeline to our repository. In this case, we put it in the same repository as all our react application in the root folder of the project. We call it pipeline-ci. jenkinsfile. We push the changes into Gitlab and we configure the Jenkins pipeline from the UI to go to check the repository instead of relying on the local code. To do this change just open the pipeline and and in the bottom select “Pipeline script from SCM” and get the grasp of how to populate the fields from the image below. Notice that in the last field the “script path” is just the name of our script in the repository because we have place it under the root of the repository.
Now are ready to run the pipeline again. This time it might be much faster because the images were already built in the previous attempts and we haven’t done any change in the code.
Webhook for Jenkins
Until here we have seen how to make the configuration of Jenkins and Gitlab to make all the hard and complex work of building the images and rendering the Kubernetes resources. So, in this naive approach, once we would make some changes in the web app, we would go to Jenkins and trigger the pipeline. However, what we really want to achieve is automation in this step as well. This means that once we push any change from the code to Gitlab, Gitlab will have to use a webhook from Jenkins and notice Jenkins to run the pipeline automatically. Once well know approach to do this is to make pooling from Jenkins to Gitlab each some period of time, but this is not efficient in terms of requests used. The best way to do it is as it has been mentioned, by using a webhook in Jenkins in which Gitlab subscribes to notice Jenkins that there’s some push, merge or any other kind of triggering operation. So, let’s put our hands to work on it.
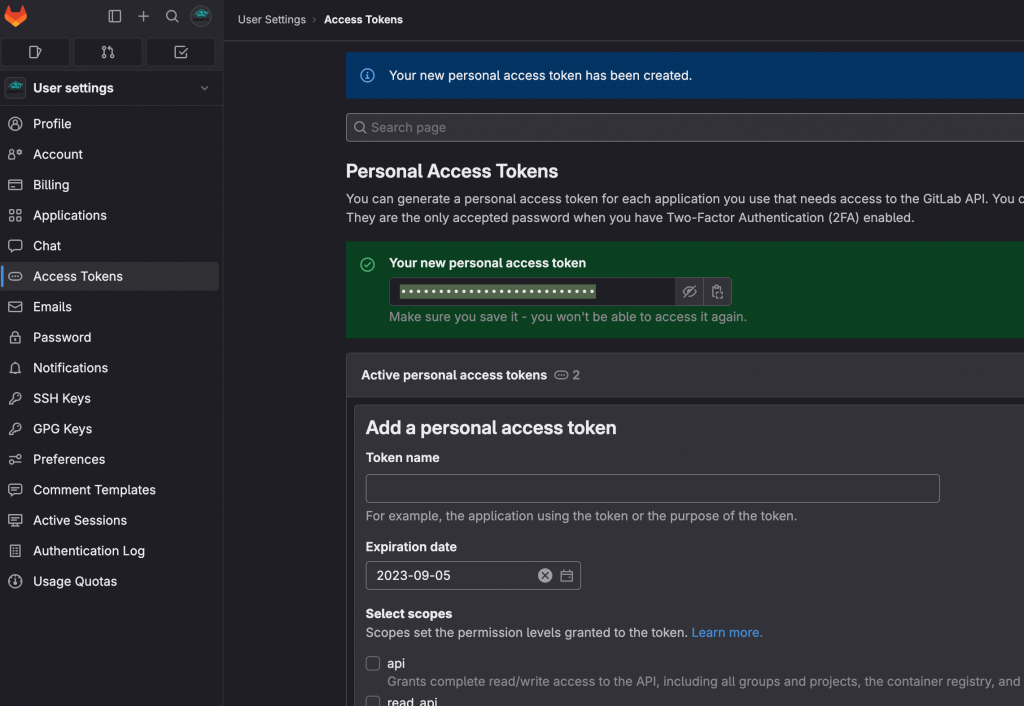
Before we configure the webhook we need to configure the relationship between Jenkins and Gitlab for the authentication. In the case of the webhook, here we choose to generate a personal access token. For this, go to Gitlab and under the “User Settings” select “Access Token”. Give it a name and select the permissions you will need for your purpose. In this case, read access would be enough.
Then we have to go to Jenkins and paste the PAT into a credential. For this go to the menu: “Manage Jenkins” -> “Credentials” -> “Add credential”. Select “Gitlab API Token”
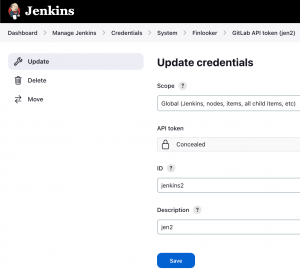
No we already have the granted permission to Jenkins to communicate with our Gitlab account via PAT.
For the webhook itself we are going to go first to Jenkins and generate the webhook in the pipeline. So, go to the pipeline configuration and scroll down until you see the”BuildTriggers” option. Here, for our need, it would be enough to mark the push events checkbox.
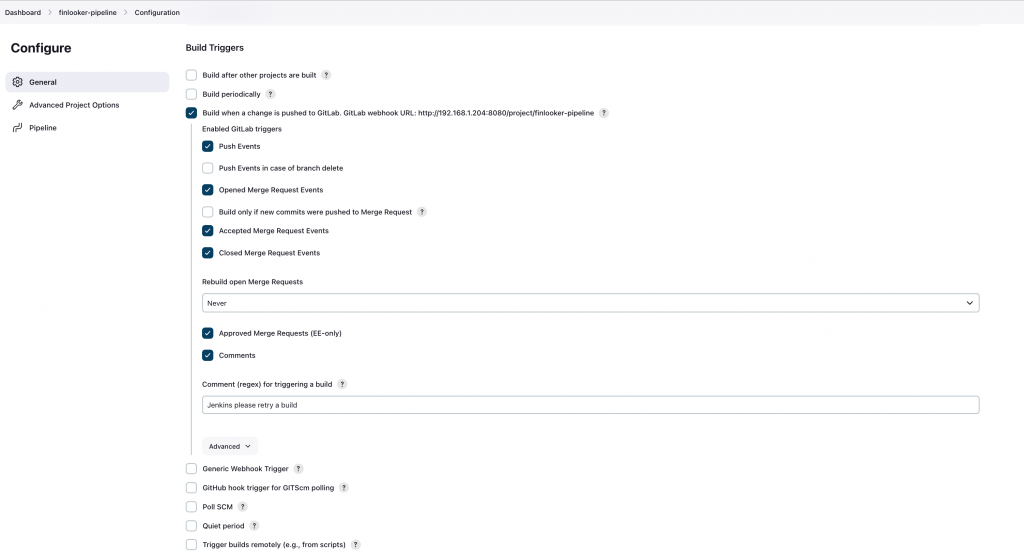
Go to advanced and generate a token. The webhook needs some kind of authorization a part from the authentication (with the PAT). Using this token is a secure and easy way to provide the authorization for using the webhook from Gitlab.
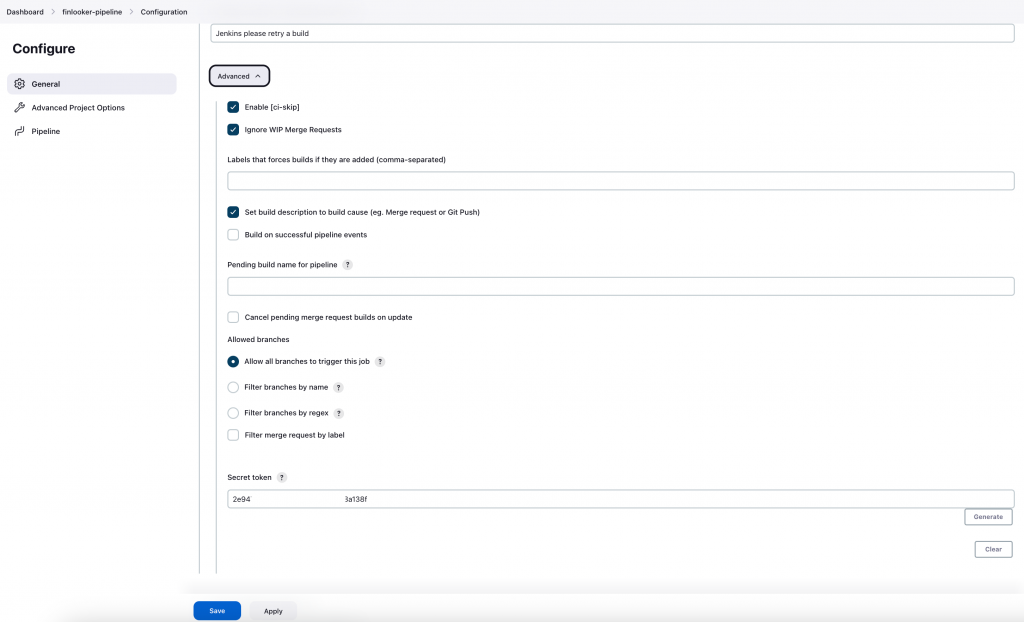
See the “Secret token” field and copy its content. Then paste it into Gitlab in the webhook screen. For this go your repository in Gitlab and select “Settings” -> “Webhooks”. There you’ll paste the address of the webhook you see in Jenkins. However, in my case, I had to change the address because the Jenkins server is working in my LAN whereas Gitlab is on the Internet. If you have the same configuration you can use your public IP address (assigned from your ISP) or you can also enable a DDNS service like no-ip as I have done to avoid losing the connection when your ISP rotates your IP (the rotation period varies with your ISP). What’s very important in this step is to mark the “push events” trigger but only for the main branch. This is done in this way because Jenkins will execute the Skaffold command to build and then push back again the changes to Gitlab so ArgoCD can take those updated images from the Kubernetes resources; specifically in the deployments definitions. But if that change is pushed back to main branch, Jenkins would detect again and this would create an infinite loop. Because the interaction between Gitlab and Jenkins is somehow limited at the time of writing this tutorial, the way to tackle these technical limitations is to just push the Skaffold changes to another branch called prd. This doesn’t have any negative impact over the development.
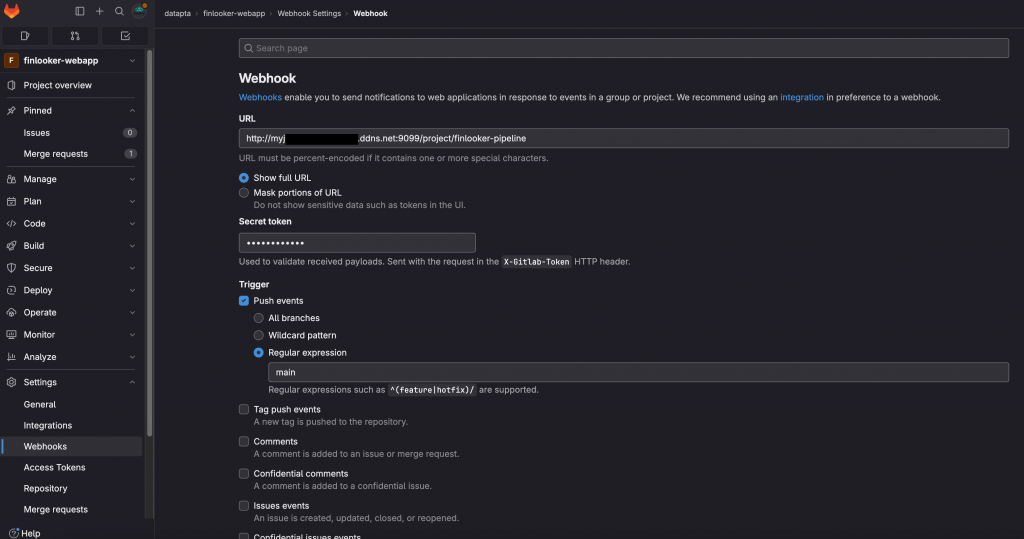
You will notice that in the webhook address it appears port 9099 instead of 8080. This is because in my case, my ISP was blocking the port 8080. If the same happens to you, there are two options: call the ISP provider and request for this port to be opened again, or you can use another port in Jenkins. For the case of this tutorial, using Ubuntu distribution, the procedure is the following:
# Edit this file because the way we have installed Jenkins leaves it running as a service
/lib/systemd/system/jenkins.service

# Modify the Environment variable with this value
Environment="JENKINS_PORT=9099 JENKINS_HTTPS_LISTEN_ADDRESS=0.0.0.0"

# Notify the systemd manager that there are changes to be applied
systemctl daemon-reload

# Restart the jenkins service
sudo systemctl restart jenkins

# Check the status of the jenkins service
sudo systemctl status jenkins
netstat -nltpu
With these steps performed we would go to Gitlab and test the webhook. Finally, all we have to do is to make some change in the code from our local machine in the main branch and push the changes to Gitlab. Gitlab will take care of noticing Jenkins that a new build has to take place. An example of the command that would trigger the build and deployment can be viewed in the following block of code.
git add .; git commit -m 'New code update'; git push
Once Jenkins performs the build and updates the prd branch, ArgoCD with auto-sync enabled would just pick the changes that got generated in the finlooker-webapp/finlooker-infra/k8s-render/prd/all-resources-prd.yaml file and would deploy them into our K3s cluster. So, at this point all the production building process would be completely automated. This is what is called continuous deployment. Let it suffice to say, that the complete DevOps pipeline typically includes a dev, tst and stg environments. However, with the explained in this tutorial the key points of how to set up such systems are explained.
Conclusions
With this we conclude the post of Jenkins, which is a key aspect in GitOps. I hope it has been short and useful at the same time. We have relied on a veteran tools such as Jenkins because it works pretty well and its architecture based on plugins has been a key aspect to grow its community and support for many and many tasks for CI/CD. In this case, Jenkins is not part of CNCF but part of CD Foundation, which contains less projects but contains Jenkins that itself is quite an important DevOps tool. There’s also the possibility to make the part of Jenkins with Gitlab CI. However, after a couple of months of having developed the code, Gitlab downgraded the free credits per months which basically made it a paid service because the building of React and Node.js images can be rather CPU consuming.
In the next posts of this GitOps series we’ll be deepening our focus on the other parts of the GitOps pipeline and more specific things related to the way a React application is ported from testing to production environment.