

Install ArgoCD in 3 minutes and learn GitOps
In today’s post we are going to see how to install ArgoCD in a straightforward way and explain what’s the function of ArgoCD in a GitOps setup. First we’ll be going though a typical GitOps setup and how it works in each step. Then we’ll take into account the rest of the CI/CD pipeline is already setup and we’ll focus on the ArgoCD part. So, let’s get started!
Crash course in GitOps
GitOps is a relatively recent concept at the moment of writing this post. So, it’s very likely that you are wondering if GitOps is a concept only related to Git. Indeed, the term GitOps refers to the fact of a software development approach where the entire application infrastructure and configuration are managed and synchronized through Git repositories. It leverages version control and pull-based deployment to achieve declarative, auditable, and automated application deployment and management. It promotes a Git-centric workflow for consistent and scalable software delivery.
The below picture shows a typical GitOps flow in which not only the CI/CD is applied to the code but also to the infrastructure in behind. This is easy to do thanks to the fact that the kubernetes deployments are written in .yaml format. So, in this sense, the kubernetes manifests are the IaC in this use case. Let’s remember the concept of immutability in the infrastructure, because it’s precisely because of kubernetes enabling this concept what leaves the whole pipeline relatively simple. In the case, we weren’t using kubernetes but we were using virtual machines, then the most common approach if we wanted to automate the infrastructure deployment would provably involve using Terraform and that would complicate things in the pipeline.
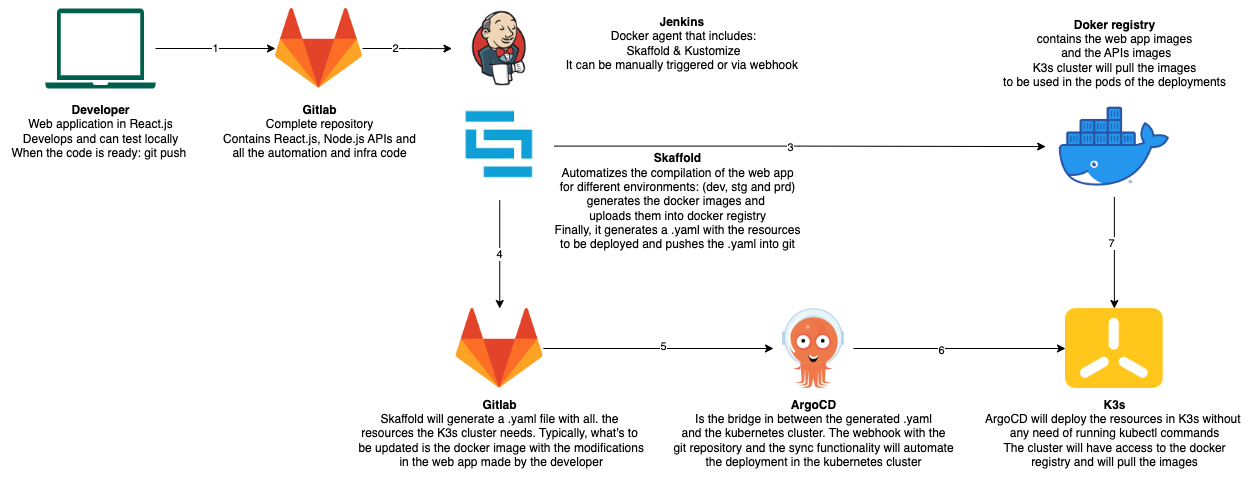 Basically, we are relying on the repo in Gitlab and Jenkins (using it as a CI tool) and ArgoCD are targeting the repo and the docker registry to manipulate all what is needed until the yaml files and the docker images are ready with the last updates. ArgoCD can select what’s to be synchronized in the K3s cluster and how. In this example, we have selected K3s distribution because of it’s easy installation and it’s support being a CNCF project.
ArgoCD Installation
We are going to install ArgoCD as a Kubernetes deployment in the same K3s cluster where our web applications will reside. ArgoCD doesn’t consume too many resources of the cluster and it’s very convenient to have it all in the same cluster. Specially, as we have everything in the Gitlab repo. including the application, the specification of the infrastructure and the specification of our CI/CD pipeline, we are more secure in terms of infrastructure and we don’t have to have so much redundancy in this sense.
kubectl create namespace argocd && kubectl apply -n argocd -f https://raw.githubusercontent.com/argoproj/argo-cd/stable/manifests/install.yaml
Then change the service to NodePort to be able to connect from your browser locally. The service is: service/argocd-server
Access to the localhost in the port indicated by the NodePort and it will ask you the credentials. The user is admin.
To get the password use the following command:
kubectl -n argocd get secret argocd-initial-admin-secret -o yaml -o jsonpath="{.data.password}" | base64 -d
Now login to ArgoCD webUI and configure the connection to the Gitlab account.
Configuration of ArgoCD
To configure ArgoCD the first point is to establish the connection with the Gitlab account. We go to settings -> repositories -> connect to repo. In this case, we have used an HTTPS connection to go faster and it will ask for a user and a pass of your Gitlab repo. But it also can be configured via SSH connection. The below picture shows how just after configuring the connection, ArgoCD will try establish the connection and report the status.

The next step in the configuration is just to include the ArgoCD application that will contain the configuration to control the deployment of our React application. ArgoCD structures the control of the deployments in logical units called applications. This applications can be created via the same webUI or it also can be done using a .yaml file. For our example we’ll use a.yaml file.
apiVersion: argoproj.io/v1alpha1
kind: Application
metadata:
  name: finlooker-dev
  namespace: argocd
spec:
  destination:
    namespace: default
    server: https://kubernetes.default.svc
  project: default
  source:
    path: finlooker-infra/k8s-render/dev
    repoURL: https://gitlab.com/datapta/finlooker-webapp.git
    targetRevision: main
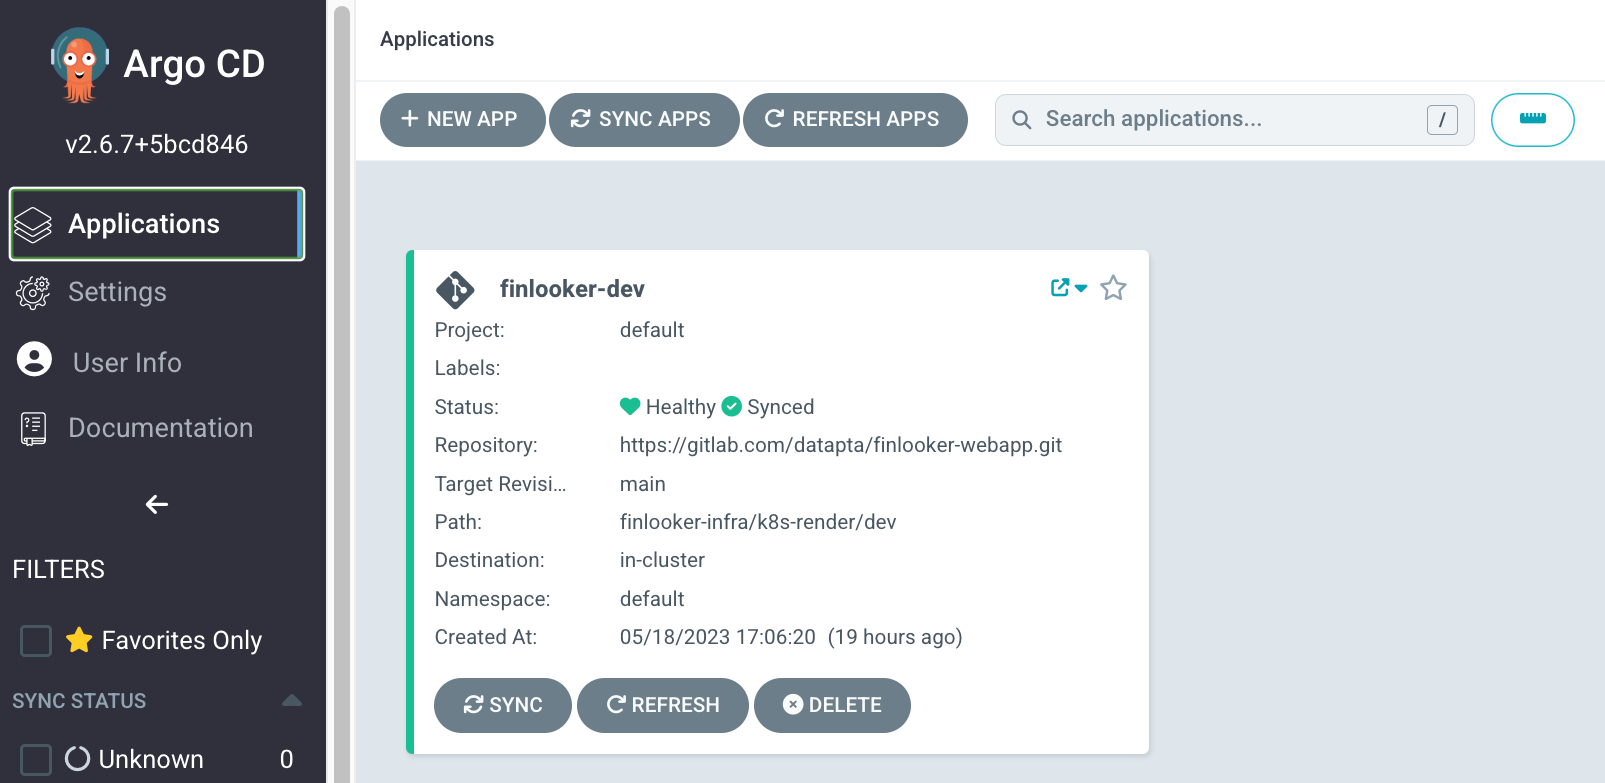
As you can see, a basic configuration is very straightforward to setup. We specify the repository as the origin and the kubernetes cluster as the destination. After the application is created we’ll be able to specify in the webUI how do we want the synchronization to be done.
Creating the application out of a .yaml file is done with the kubectl apply command.
kubectl apply -f finlooker-infra/argocd/finlooker-dev.yaml
After having specified the ArgoCD application we’ll configure the way the sync is done. For our example, we are going to make click in “Sync” button and just accept the default values. Notice how it’s possible to sync only for some resources of the .yaml file, which is something very powerful. What we have done here corresponds to the point 5 of the diagram. We have configured the webhook to automatize pulling the updates from the repo and then configured in ArgoCD how to treat and manipulate those updates in the infrastructure.
Monitoring our web application
Now that the the ArgoCD has been set up, we can see the status of the web application by having a diagram view of the all the Kubernetes resources that have been deployed. We also see the status of the synchronization with the Gitlab repository and if that is well translated into the underlying K3s cluster. ArgoCD provides with additional useful functionalities such as selectively deleting resources or going back into a previous version of the .yaml and redeploy it. We can do these things from the webUI what will save us from having to do these operations using the typical kubectl commands.
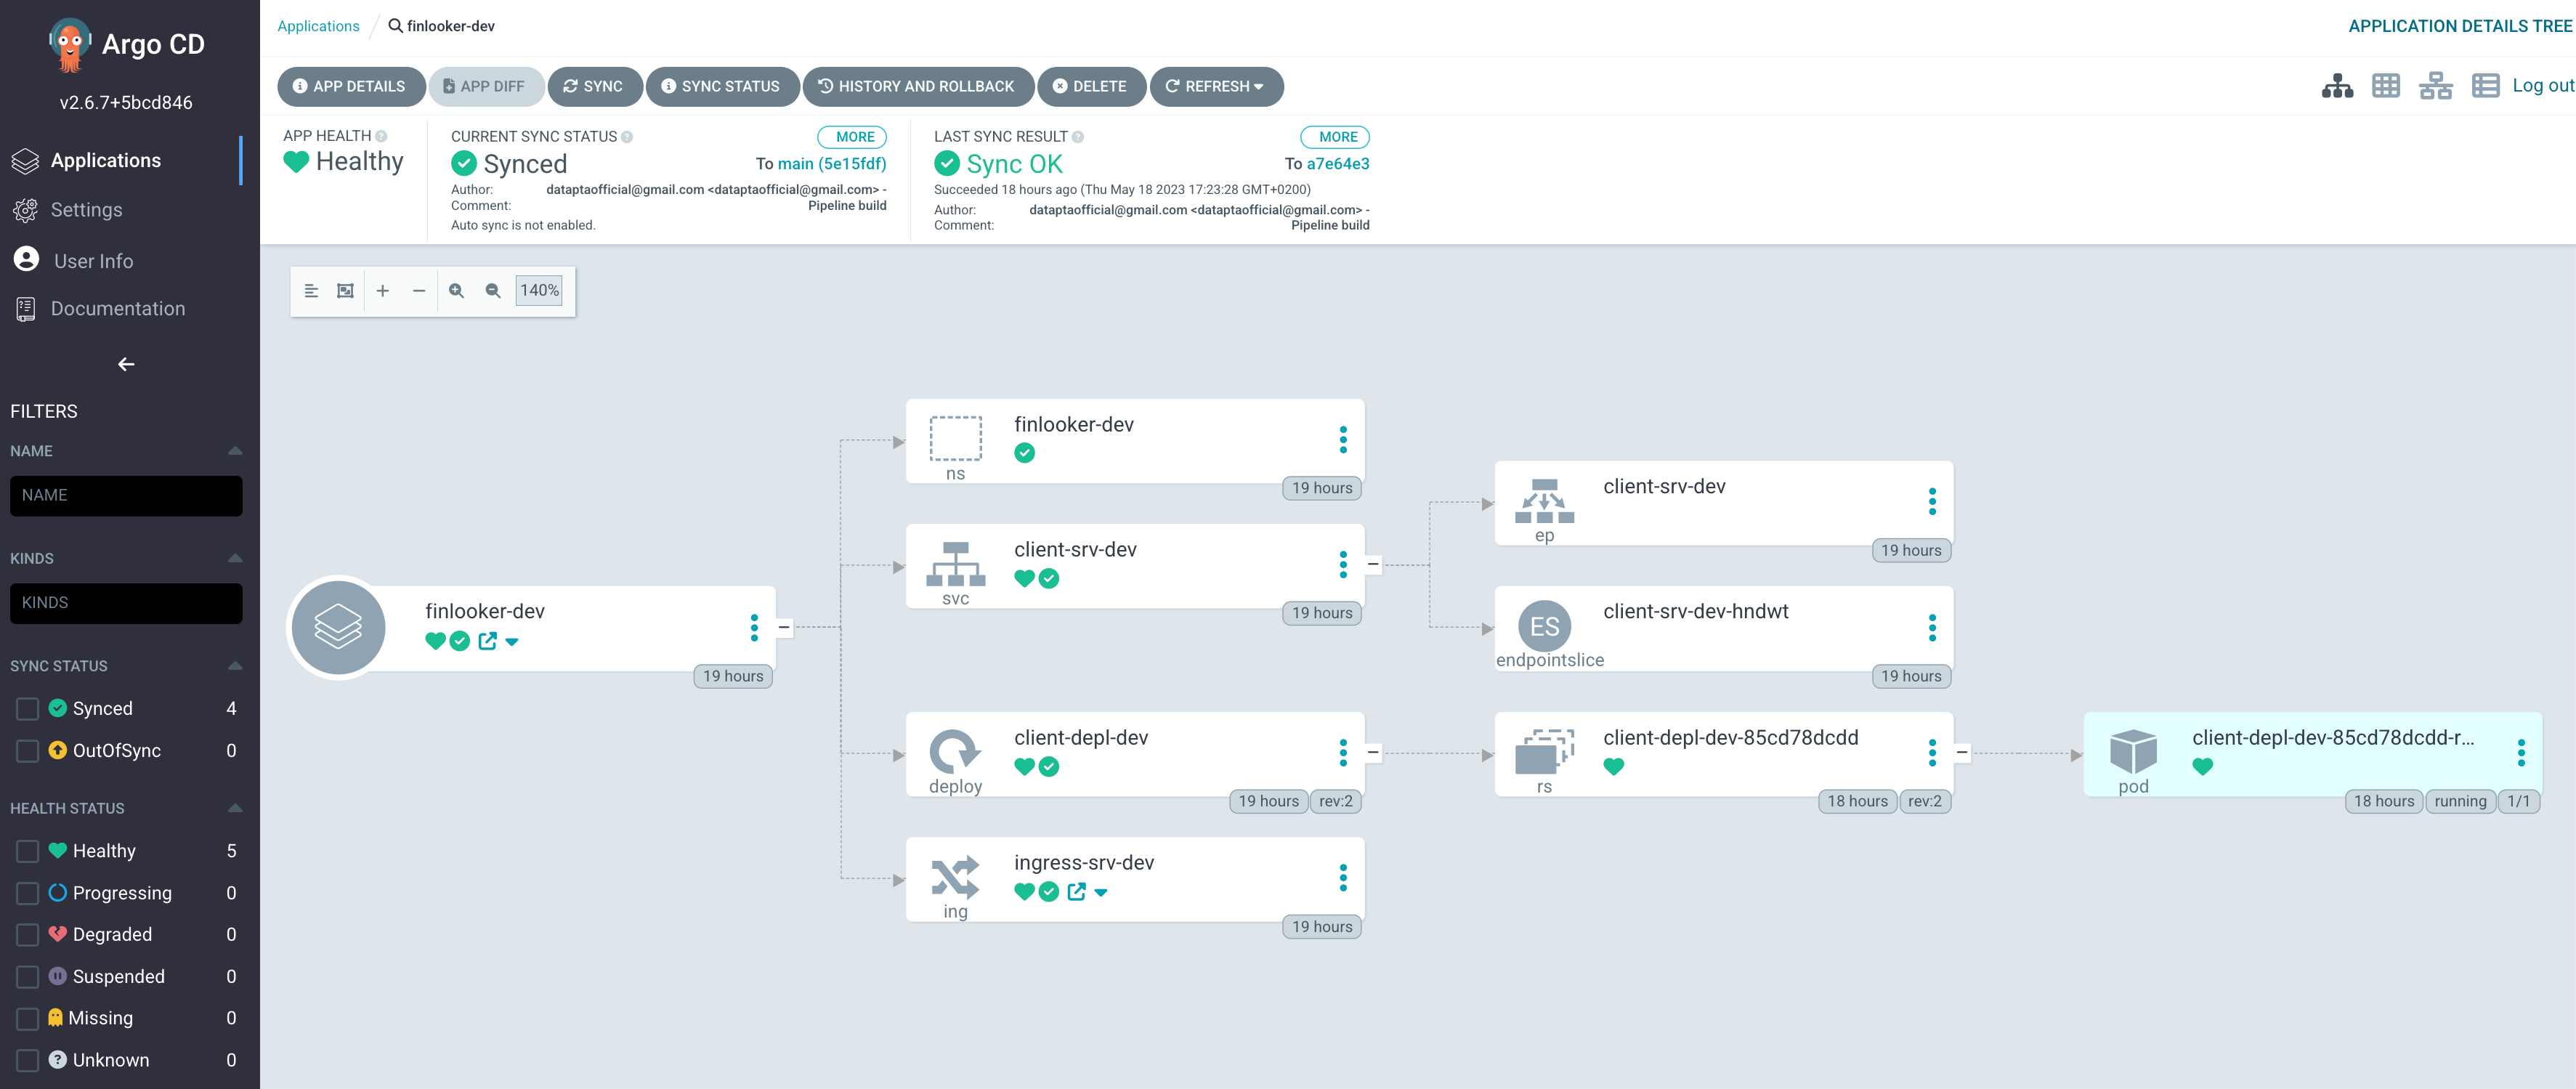
When doing the deployment is interesting to manually connect to the cluster machine and just do a “kubectl get po -A” for example. You’ll see how the pod takes some time to be ready depending on how heavy is your Docker image. Remember these lasts steps we have done correspond to the steps 6 and 7 in the diagram, we just deploy the ArgoCD application and when doing the sync ArgoCD makes the step 6 for us in the background, while step 7 is just K3s pulling the images from the Docker registry just at it will do the same if we deployed using a “kubectl apply -f all-resources.yaml” command.
Conclusions
With this we conclude the post of ArgoCD and learning GitOps. I hope it has been short and useful at the same time. With the increasingly use of Kubernetes and tools such as Skaffold that have a good integration with Kustomize allowing to define infrastructure for different environments in an elegant manner, the remaining tool the CNCF ecosystem needed was something like ArgoCD, that allows to synchronize in a configurable way our deployments in a Kubernetes cluster.
In the next posts of this GitOps series we’ll be deepening our focus on the other parts of the GitOps pipeline where things will include having some understanding on the web application.