

Spark cluster with Airflow on Kubernetes
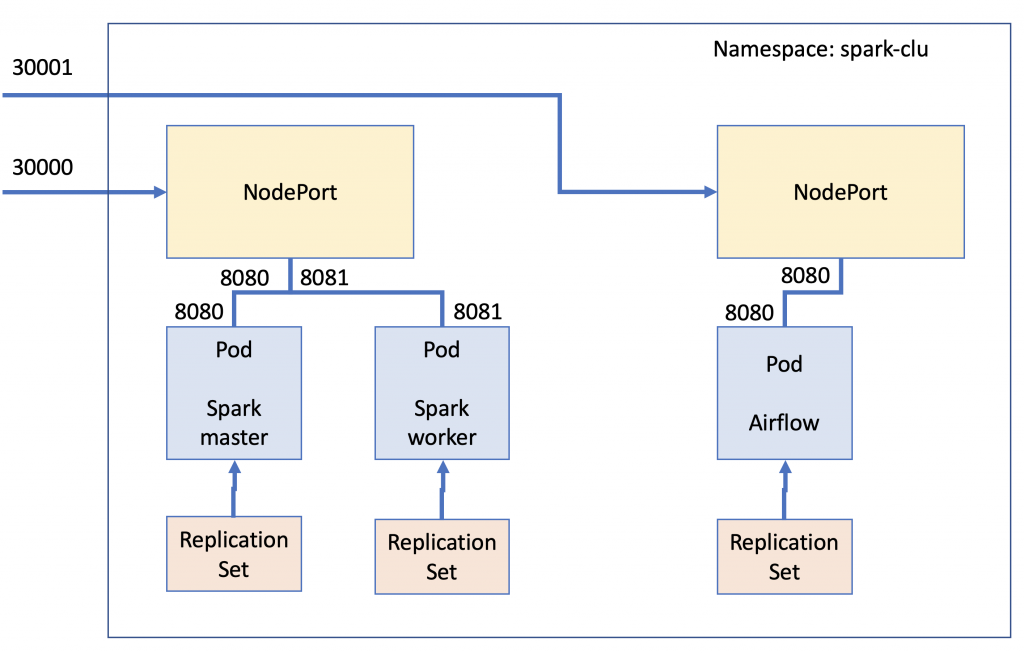
Architecture diagram
In this tutorial Kubernetes will be used to create a Spark cluster from which parallel jobs will be launched. The launch of the jobs won’t be done directly through the master node of the Spark cluster but from another node running an instance of Airflow. This provides more control over the executed jobs as well as interesting features such as backfill execution. This consists in performing executions that corresponded to past time from the current time, when the the scheduling is defined.
The picture below shows roughly how the components are interconnected. For this example, a Pod for each service is defined. Inside the spark cluster, one Pod for a master node, and then one Pod for a worker node. However, the yaml will be configured to use a Daemonset instead of a Deployment. This tells to Kubernetes to allocate exactly one Pod for each node in our cluster. A Nodeport service is defined to get access from the outside to the Spark cluster. Additionally, a second Nodeport is defined to get access to the Airflow Pod. Each Pod will be controlled by a Replicaset that will be responsible of keeping that Pod always up and running.
Introducing Airflow
Airflow was developed internally at Airbnb as a tool to programmatically schedule and monitor workflows. Its success is given to the fact that more and more technologies are appearing in the area of Big Data and the old way of having everything inside an application to perform an ETL such as Pentaho or executing some batch jobs though cron is getting obsolete. To meet this necessities, Airflow consists in a very powerful server and scheduler that offers an Python API to define what is called executors through which the programmer can specify tasks and how will they be executed in the form of a DAG (directed acyclic graph). Airflow web UI looks like the picture below. In the picture, each row represents a DAG. That is to say, a workflow where each node of the graph is a task that will be executed in order according to the graph node edges.The scheduler accomplishes what cron tool makes in Linux. It is very easy to enable and disable each DAG by making click to the matching switch. There is also in each row a series of circles that act as a semaphore with a colour code indicating the state of each phase in the tasks of the DAG. For example if running phase went well, one of the circles will be coloured green.

Infrastructure definition
Having had a look to the architecture diagram and making a very brief introduction to Airflow, let’s code the yaml file that will define the whole infrastructure. In this case, all the infrastructure has been defined in a single file. This can be done by using “—” to separate each of the Kubernetes components. To begin with, the namespace for the whole infrastructure is set to “spark-clu”.
Next is to define the service as a Nodeport for the Spark master Pod. This will allow to connect to the master to for example see the Spark jobs execution through its web UI. Then a deployment for the Spark master node is define and a Daemonset is defined to deploy the worker nodes. Remember here, that the daemonset will create exactly one Pod for each node of the cluster. This is an easy way to create clusters in Kubernetes that balance the workload across the available hardware resources.
apiVersion: v1
kind: Namespace
metadata:
  name: spark-clu
---
apiVersion: v1
kind: Service
metadata:
  name: spark-cluster
  namespace: spark-clu
spec:
  selector:
    app: spark-master
  ports:
  - name: webui
    protocol: TCP
    port: 8080
    targetPort: 8080
    nodePort: 30000
  - name: master
    protocol: TCP
    port: 7077
    targetPort: 7077
  - name: master-rest
    protocol: TCP
    port: 6066
    targetPort: 6066
  type: NodePort
---
apiVersion: apps/v1
kind: Deployment
metadata:
  name: spark-master
  namespace: spark-clu
  labels:
    app: spark-master
spec:
  selector:
    matchLabels:
      app: spark-master
  template:
    metadata:
      labels:
        app: spark-master
    spec:
      containers:
      - name: spark-master
        image: bde2020/spark-master:2.4.4-hadoop2.7
        imagePullPolicy: Always
        ports:
        - containerPort: 8080
        - containerPort: 7077
        - containerPort: 6066
---
apiVersion: apps/v1
kind: DaemonSet
metadata:
  name: spark-worker
  namespace: spark-clu
  labels:
    app: spark-worker
spec:
  selector:
    matchLabels:
      name: spark-worker
  template:
    metadata:
      labels:
        name: spark-worker
    spec:
      containers:
      - name: spark-worker
        image: bde2020/spark-worker:2.4.4-hadoop2.7
        imagePullPolicy: Always
        ports:
        - containerPort: 8081
---
apiVersion: apps/v1
kind: Deployment
metadata:
  name: airflow
  namespace: spark-clu
  labels:
    app: airflow
spec:
  selector:
    matchLabels:
      app: airflow
  template:
    metadata:
      labels:
        app: airflow
    spec:
      containers:
      - name: airflow-c
        image: greattenchu/centos-ariflowforcluster:1.0
        imagePullPolicy: Always
        ports:
        - containerPort: 8080
        volumeMounts:
        - mountPath: /root/airflow/dags
          name: volume
      volumes:
        - name: volume
          hostPath:
            path: /.../.../airflow-spark/dags
---
apiVersion: v1
kind: Service
metadata:
  name: airflow-instance
  namespace: spark-clu
spec:
  selector:
    app: airflow
  ports:
  - name: webui
    protocol: TCP
    port: 8080
    targetPort: 8080
    nodePort: 30001
  type: NodePort
Now it is turn to define the Airflow instance, also through a Deployment. Notice how the namespace is the same as for the Spark cluster. This allows to connect using machine names from Airflow to Spark master node for example. For the Airflow container a volume will be mount. This way, DAGs can be programmed locally in the shared folder and then, after some seconds, they will appear in the Airflow web UI. Finally, the Nodeport for the Airflow Pod is defined. Take notice of the Nodeport selector here; it is pointing to the airflow app instead of the spark-master.
Airflow custom Docker image
For this tutorial a custom Docker image of Airflow has been developed. There are some already prepared images on the Internet that contain an Airflow installation inside a very lightweight Linux distribution. For example the Puckel build. However, to execute Scala Jobs SSH operator will be required and for this reason a custom build is done. In this case, we start from a Linux CentOS image and make a basic installation of Apache Airflow. The Dockerfile is included below:
FROM centos:8

RUN yum update
RUN yum -y install gcc
RUN yum -y install platform-python-devel.x86_64
RUN yum -y install python3-pip
RUN export AIRFLOW_HOME=~/airflow
RUN pip3 install apache-airflow
RUN pip3 install apache-airflow[ssh]
RUN airflow initdb
RUN yum -y install tree vim
RUN yum install -y epel-release
RUN yum -y update
RUN yum install -y supervisor
RUN airflow initdb

COPY supervisord.conf /etc/supervisord.conf
COPY airflow_wrapper_script.sh airflow_wrapper_script.sh
RUN chmod 777 airflow_wrapper_script.sh

EXPOSE 8080
CMD ["./airflow_wrapper_script.sh"]
The image is basically an Airflow installation inside a CentOS 8 Linux. First the dependencies of Airflow are installed, then the ssh module for Airflow is installed. This will allow to use the ssh operator in Airflow, what will enable to launch any command from Spark. In this case, the spark-submit command. Vim and tree are also included as auxiliary tools but they would be not needed.
Airflow has two processes that should be run in order to use it with all its functionalities. These are the the web server UI and the scheduler. The former one is in charge of providing the user interface that has been shown previously, whereas the later one is the schedules the DAGs executions. Because the best practices for Docker includes only executing one command per container, executing two commands can be achieved in different ways. For example: the first attempt was to use supervisor, which is a process manager. This gives a lot of power to the programmer to launch multiple process. However, its utilisation results to be CPU intensive for the container. For this reason, in this tutorial has opted to use a script that runs the two processes. The code is shown below:
#!/bin/bash

# turn on bash's job control
set -m

# Start the primary process and put it in the background
airflow webserver -p 8080 &

# Start the helper process
airflow scheduler
# the my_helper_process might need to know how to wait on the
# primary process to start before it does its work and returns

# now we bring the primary process back into the foreground
# and leave it there
fg %1
Configuring Spark nodes
Until here the tutorial has explained a basic configuration to have the cluster set in Kubernetes. However, to actually be able to order execute code from Airflow there are some tuning that has to be done. Let’s first connect to the Spark master container and install the ssh server. If not Airflow’s ssh operator won’t be able to connect to the Spark master node.
apk add openssh
apk add openrc # for next commands
rc-update add sshd
rc-status
touch /run/openrc/softlevel
/etc/init.d/sshd start
apk add vim
vim /etc/ssh/sshd_config
PermitRootLogin yes
/etc/init.d/sshd restart
Now let’s set the environment to be able to compile Scala code. In this case, it is assumed that the container has enough resources to compile. However, the same can be done in another machine, just to compile the code and then upload the .jar into the master node. The commands below will install the SBT compiler into the Alpine Linux distribution of the master node. Remember that Alpine Linux is a very lightweight distribution. This is the reason why some additional steps and packets are being install.
apk add gzip
export PATH="/usr/local/sbt/bin:$PATH" && apk update && apk add ca-certificates wget tar && mkdir -p "/usr/local/sbt" && wget -qO - --no-check-certificate "https://piccolo.link/sbt-0.13.16.tgz" | tar xz -f sbt-0.13.16.tgz && mv sbt /usr/local/ && sbt sbtVersion
/usr/local/sbt/bin/sbt
Building the Scala project
It’s turn to build the Scala project and run it into the cluster. This tutorial is not aimed to explain into detail Scala and how to build a project. Anyway, the following folders structure can be taken as an example for your tests.
/test
	/project
	/src
		/main
			/scala
				hiworld.scala
	/target
The file that specifies the dependencies can be defined like the code below. Spark core and Spark SQL are included for the test. Define a file called helloworld.sbt and put it into the root directory of the project.
name := "helloworld"
version := "1.0"
scalaVersion := "2.11.12"

libraryDependencies += "org.apache.spark" %% "spark-core" % "2.4.0"
libraryDependencies += "org.apache.spark" %% "spark-sql" % "2.4.0"
As an example of code you can take the code of below. A Spark session is created to then run a word counter over a text file. It is very important to notice here that while setting the Spark configuration of the Spark session, the master address was provided. The way to run the cluster is as standalone cluster. This is how the docker images are configured, and this tutorial doesn’t go into configuring Yarn or Mesos cluster.
import org.apache.spark._
import org.apache.spark.sql.SparkSession

object helloworld {
  def main(args: Array[String]) {
    val appID: String = "spark1"
    val conf: SparkConf = new SparkConf().setMaster("spark://spark-master-5fbb9c7b66-dn7cj:7077").setAppName("hiworld").set("spark.ui.enabled", "false").set("spark.driver.host", "localhost").set("spark.app.id", appID)
    val spark = SparkSession.builder().config(conf).getOrCreate()
    println("Hello, world")

    import spark.implicits._
    val wc=spark.read.text("/helloworld/shakespeare.txt").as[String]
    val wordmap = wc.flatMap(value => value.split("\\s+"))
    val WordGroup = wordmap.groupByKey(_.toLowerCase())
    println("Word Count—->"+WordGroup.count().show())
  }
}
To compile the code execute the build command. This command not only compiles the code but also generates the .jar that can be submit to the Spark cluster, in this case, using the spark-submit command.
/usr/local/sbt/bin/sbt package

/spark/bin/spark-submit --class "helloworld" --master=spark://spark-master:7077 ./target/scala-2.11/helloworld_2.11-1.0.jar
Before executing the spark-submit the Spark cluster has to be initialised. The Spark Docker images from bde2020 don’t come built to configure themselves once they are running. For this reason it is needed to configure them manually with the commands of below. Bear in mind that the important parameter is the IP of the master node.
#Inside of the Workernode
apk add procps coreutils rsync && /spark/sbin/start-slave.sh spark://10.1.0.49:7077
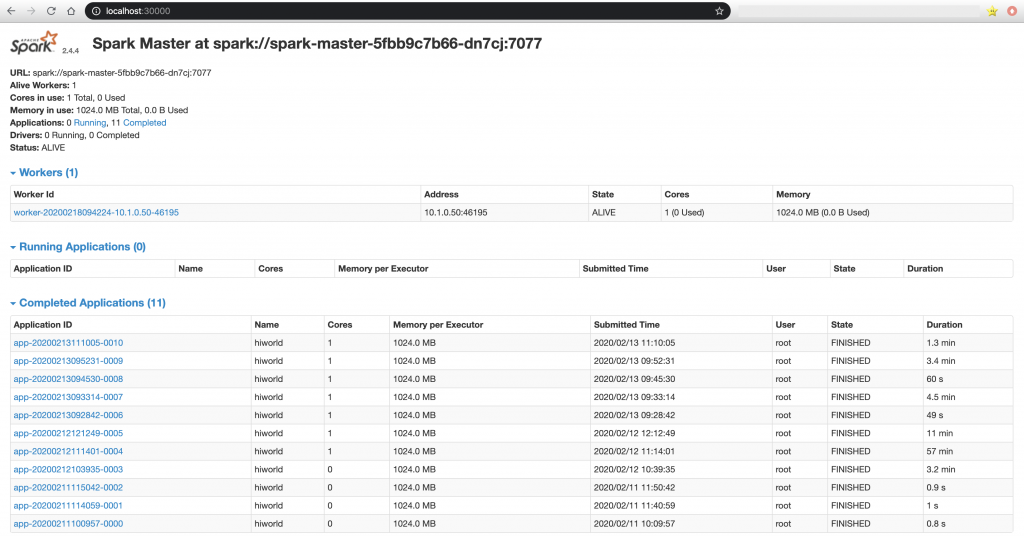
Now checking out the Spark Web UI the alive workers section should show 1 worker alive. If some applications were running in the cluster, the running applications section would show the application ID of them. Notice that it is also possible to see the worker of the cluster and get information of them, but only if they are registered with the previous command.
Deploying the DAG in Airflow
Setting up the DAG so Airflow executes the command on our behalf is done with the SSH operator as this allows to execute any command that can be launched from ssh, which is what we need in this case, to execute the spark-submit command over a scala Spark code.
from datetime import timedelta, datetime
import airflow
from airflow import DAG
from airflow.contrib.operators.ssh_operator import SSHOperator

default_args = {
    'owner': 'airflow',
    'depends_on_past': False,
    'email': ['airflow@example.com'],
    'email_on_failure': False,
    'email_on_retry': False,
    'start_date': datetime.now() - timedelta(minutes=20),
    'retries': 1,
    'retry_delay': timedelta(minutes=5),
}
dag = DAG(dag_id='sparkscalasshoperatordag',
          default_args=default_args,
          schedule_interval='0,10,20,30,40,50 * * * *',
          dagrun_timeout=timedelta(seconds=120))

t1_bash = """
/spark/bin/spark-submit --class "helloworld" --master=spark://spark-master-5fbb9c7b66-dn7cj:7077 --deploy-mode client --conf spark.driver.host=spark-client /helloworld/target/scala-2.11/helloworld_2.11-1.0.jar
"""
t1 = SSHOperator(
    ssh_conn_id='ssh_default',
    task_id='sparkscala_ssh_operator',
    command=t1_bash,
    dag=dag)
Once the DAG is uploaded to the shared folder with the container of the Airflow, it is only necessary to make click on the correspoding DAG switch and Airflow’s scheduler will execute the DAG according to the schedule interval. In this case every 10 minutes.
Troubleshooting
When running the Spark cluster, depending on the RAM capacity of your underlying hardware, it can happen that little RAM is assigned by default to the containers in comparison to what Spark processes need. In this case, the containers can be shut down by Kubernetes. This will show up an error of “command terminated with exit code 137″, which indicates an OOM problem. To solve this issue this post can be check out to perform the tuning in the Java of the node. Alternatively, more memory can be allocated to the containers. If running Docker on Mac, more resources for the cluster can be requested from the control panel. In any case, the resources for the containers can be set within the yaml file. To have more information of this concern the following link contains examples.
Conclusions
The tutorial has explained how to set up the Spark cluster and how to run the jobs from Airflow with a timing. It is clear to see that Kubernetes allows to test system without having to reserve or dedicate hardware to the purpose and this facilitates and makes much more comfortable trying new things, ways of working, new features, different configurations, etc. On the other hand, some drawbacks appear when using Kubernetes. For example: images are mostly based in lightweight version of OS, which forces additional configurations when something a bit different needs to be done. Networking configuration files also need attention from the programmer because the cluster to be configured is different in each case. However, the overall impression when using Kubernetes is very positive. In this case it has made much faster setting up the system but in a corporate environment Kubernetes provides a tidied way of make deployments and a lot of control of the deployed infrastructure.